Showing posts with label cake. Show all posts

Saturday, January 10, 2015

Respectable King Cake

Happy Carnaval!

It's just a few days past 12th Night (aka - 3 Kings Day/Epiphany), and it is now carnaval time in the NOLA (New Orleans, LA) area, leading up to Mardi Gras!

Parades happen all throughout, and many, many festivities!

As the hoopla is getting going, so is the desire for Cajun dishes.

Our family celebrates Mardi Gras (now), even though we've never been to the NOLA area during this time. My hubby has been there for some mission work to help with some cleanup from Hurricane Katrina, but that's the extent of it.

One of these days, I would love to go! I have an online friend that lives there & keeps me up-to-date. I want to go meet her, too. In the meantime, I recreate what I can, here in the midwest.

We usually make Dirty Rice around this time. I've made my own, but we tend to be convenient & use either Zatarain's or Knorr's. I add our own ground beef, sausage, bell peppers & celery when I make it.
Last year, we switched it up! We did a divided shrimp boil with potatoes, corn & sausage. YUM!! I also used Zatarain's Red Beans & Rice to accompany it. Sometimes we use Knorr's version of it, too.

I've also made some versions of a Hurricane mocktail. I even bought short hurricane vases to use as glasses to serve it up in! I just need to track down what I actually did for it. That's for another time.

I also added another Carnaval/Mardi Gras staple to the celebration last year. I finally faked a King Cake!! I say "faked" since I needed a shortcut to get the same type of result. I was trying to find which recipe I basically used from last year, but couldn't find it, or even very few others, due to links being gone/broken or now having a virus or spam attached to the link. Bummer. So, I remember the basis & was ready to do a test run as I attempt to make it a few times during this year's Carnaval as it leads up to Mardi Gras! I also research & try to do my best to recreate something as authentic or authentic-like as possible...even in short-cut mode...yet still respectable.

(check out some of my past Mardi Gras celebrations HERE)

Here's what I did:

**********


RESPECTABLE KING CAKE


Ingredients:

* 3 Cinnamon roll cans, with cream cheese icing (set aside)
* 2-3 T butter, melted
* 1/4 C brown sugar (not packed)
* 2-3 T ground cinnamon
* 1 T lemon juice or 1/2 tsp lemon extract
* sanding or decorating sugars in purple, green & gold/yellow (the darker colored, the better)
* 1 tiny plastic baby (without the King baby, it's only "cake")


Directions:

1. Preheat oven to 400 degrees F or what your canned cinnamon roll packaging tells you

2. On a flat, clean, then floured surface, open the cans of cinnamon rolls, setting the icing packets aside for later, and use hands to squish it all together to create a lightly-kneaded cinnamon roll dough ball; I unrolled them all, first, then squished them together


3. With a rolling pin, gently roll out the dough ball so it makes one large rectangle-like shape, about 20-22" long; be careful not to make it too thin, maybe a quarter-inch to haf-inch thick
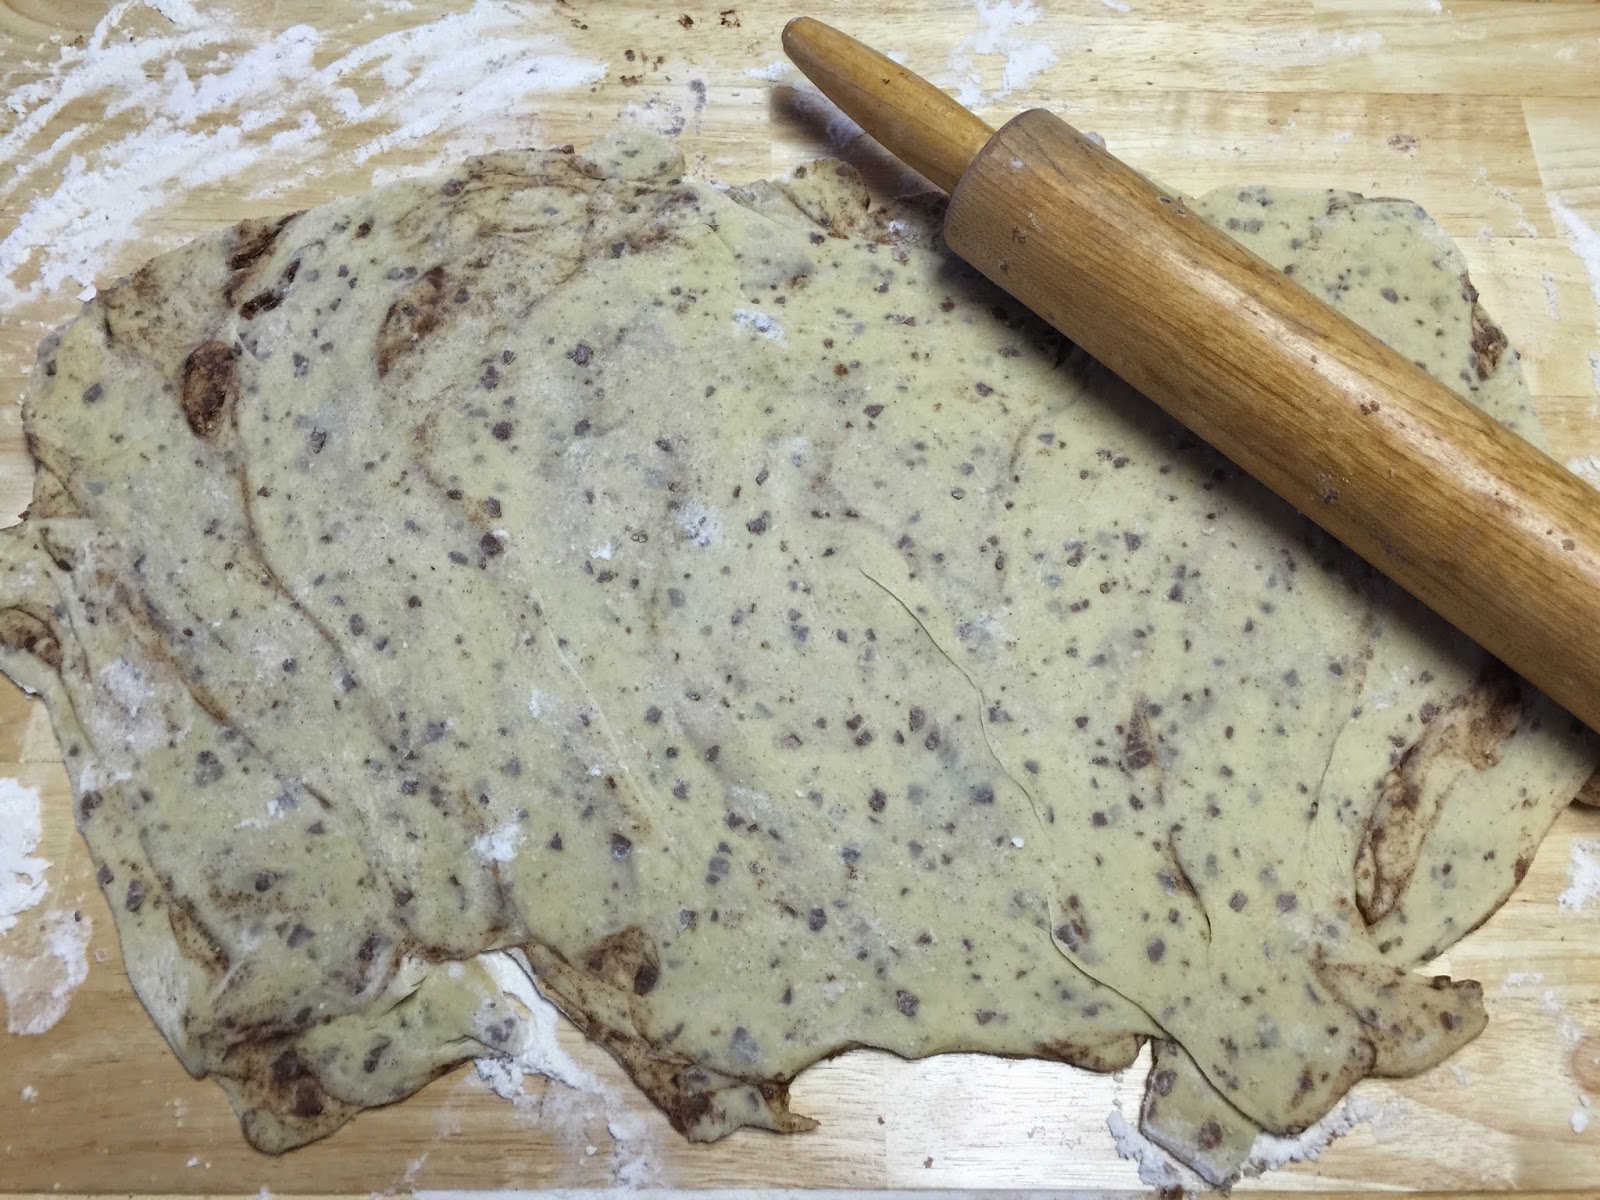


4. In a microwave-safe dish or bowl, melt the butter for just a few seconds; 20-30 seconds should probably do the trick


5. When the butter is melted, with a spoon or basting brush, "paint" the butter over the top side of the flattened cinnamon roll dough


6. Once the surface of the dough is covered in melted butter, sprinkle the surface with the brown sugar & ground cinnamon (you may not use all of it, but even sweeter if you do)


7. After the dough is covered with butter & brown sugar, begin tight-rolling the dough back up; start from one of the long sides & roll to the other - keep tucking & rolling (it may take some time depending on how long your dough is rolled out to be), until you have the dough rolled into a log


8. Take a bundt pan (or fluted pan) & spray it with cooking spray (I love using the one with flour already in it)


9. Carefully take your cinnamon roll dough log & snake it into the bundt pan, pinching the ends together, when it makes a full circle, to close it as best as you can; make sure the "seam" of the roll is facing upward in the pan


10. Place the pan with the cinnamon roll cake circle into the oven for about 20-30 minutes, until golden brown (check to make sure it's baked thru - not to "squishy")

11. While the cake bakes, take the packets of cream cheese icing & combine them together into a small bowl or directly into a small storage baggie


12. Add the lemon juice/extract (I used lemon juice) into the cream cheese icing, then mix it together (if it's in a small baggie, close the baggie & "mix" it by squeezing & "pinching" the mixture); set aside, best in the fridge until ready to use


13. Once the cake is done baking, remove from inside the oven & allow to cool IN THE PAN for about 10 minutes


14. After the cake is fairly cooled, take the tiny plastic baby & insert it SOMEWHERE in the cake


15. On a round plate or platter large enough for the cake, invert the cake pan onto the plate so the cake exits the pan & onto the plate/platter


16. When the cake is cool enough that icing won't melt when added to it, drizzle/spread the lemon-ized cream cheese icing over the top of the King cake (now there's the baby in it); if you are using a storage baggie with the mixture, cut a hole in one of the bottom corners of the baggie & squeeze the icing over the top of the King cake; let it "drip" down the sides, then use a little rubber spatula or small knife to even out the covering, if need be, depending on how thick the icing is


17. While the icing is still "wet", begin to sprinkle the sugars in alternating colors in a stripe pattern to adhere to the icing


18. Allow icing glaze to set & harden; about 30 minutes to an hour

19. Slice CAREFULLY (there's a baby in there!) & serve

No baby...just layers of sweet deliciousness...

See? There's a baby in there!


Yield: up to 18 (depending how small you cut the pieces)

**********

The pics, above, are from my early test-run. After I went thru all the steps I need to so I could remember what the heck I'd done before, I now know what I need to do differently the next time around. I will update this post when I have pics of the updated product. Use the ingredients I have listed!! It's what I will use next time around...
This time, I didn't use enough cinnamon rolls to make the cake a bit thicker & fuller, and maybe baking it a minute or so longer than I did this time.

My NOLA friend was kind enough to send me a couple of King babies to use in future cakes (yes, the one in the pic, above, is one of them). And, after I was worried how my King Cake looked last year, she saw the pics & said it looked like King Cake to her! WHEW! I do try really hard to get culture as authentic as I possibly can...within my skill set & resources.

(By the way, King Cake is also delicious the next morning for breakfast with your coffee. It's pretty much a beautifully decorated cinnamon roll. BOOM! You're welcome.)

Also, when you serve the cake in slices, whoever ends up with the baby usually gets a special prize or holds the next get-together...something. And they can keep the baby to use in their making of King Cake!

Someone is getting da baby...

Looks like it was my hubby who got da baby! Guess I need to figure something special. LOL!


Also, a little history in some of what's going on with the King Cake/Carnaval/King Cake colors...

Purple - Justice
Green - Faith
Gold - Power

On a semi-different, but totally the same, note, there were 3 gifts given by the magi to Baby Jesus, celebrated on Three Kings Day/12th Night (aka - the 12th day of Christmas), which is January 6th. Even though the Bible states 3 gifts given, it's often depicted as 3 wise men, one to bring each gift...even though it's never stated how many magi showed up. It's plural...so there were at least 2, but not sure how many for sure.

Some have pointed out that the colors of Mardi Gras/Carnaval also seem to represent the gifts:

Gold - gold
Green - frankincense
Purple - myrrh 

And they were on their journey to find Baby Jesus (aka - King Baby), which actually took them 1-2 years after Jesus was born. Interesting fact! Right?

Oh! You need to remember...the cake without the baby is just "cake"! Maybe a Carnaval Cake?? Can we make that a thing that sticks in case you don't have the baby but want to make the cake? You'd still respect the cake. Amm-i-rite?

See? An easy-peasy recipe AND we learned a little something! You're welcome.

Hope you enjoy it & make it a few times between now (or beginning January 6th) thru Mardi Gras!

Laissez les bon temps rouler!
(That's French for "Let the good times roll!")

ENJOY!

**********
UPDATE:

I finally got around to doing a cake with the right amounts of stuff & a couple of tweaks.


Isn't it beautiful? Yeah it is!

I have figured out that I should bake this for about 25 minutes in MY oven. I still say start checking at 20, and keep it in, if needed, for around 30 minutes. Each oven is a bit different. You want golden brown & not super squishy. I slightly over baked this one by leaving it in for the full 30 minutes without checking. Hey...I was multitasking...and just forgot. Thank God for the timer!

Also, when I prepared the icing glaze, I also added some extra powdered sugar to insure it was less runny. I added about a quarter of a cup & squished it in with the cream cheese icing & lemon juice. It worked like a charm! A perfect dripping without running. And it gave a beautiful canvas for the colors.

I decided to make the colors pop a bit more with one of my favorite decorating tools: spray color.


Yes. When my kiddos want me to bake a cake that I have to cover in a color, I turn to this Wilton product to just spray...and it gives a fun, airbrushed, artistic look to it. Just watch where you use them, wear an apron for protection, and spray. They are aerosol cans, so it will have particles floating...so just make sure you watch where it goes. I love them. And I just happen to have colors I needed for the cake!


So, with the thicker white icing with the colors sprayed was already awesome looking...but you know I was adding the colored sugar, too! And I wound up with a bold color cake! So happy with it!!


But I'm going to make a confession about this update, I didn't put the baby in it. So it's what I consider "Carnaval Cake". It looks like King Cake...but it doesn't have the baby.
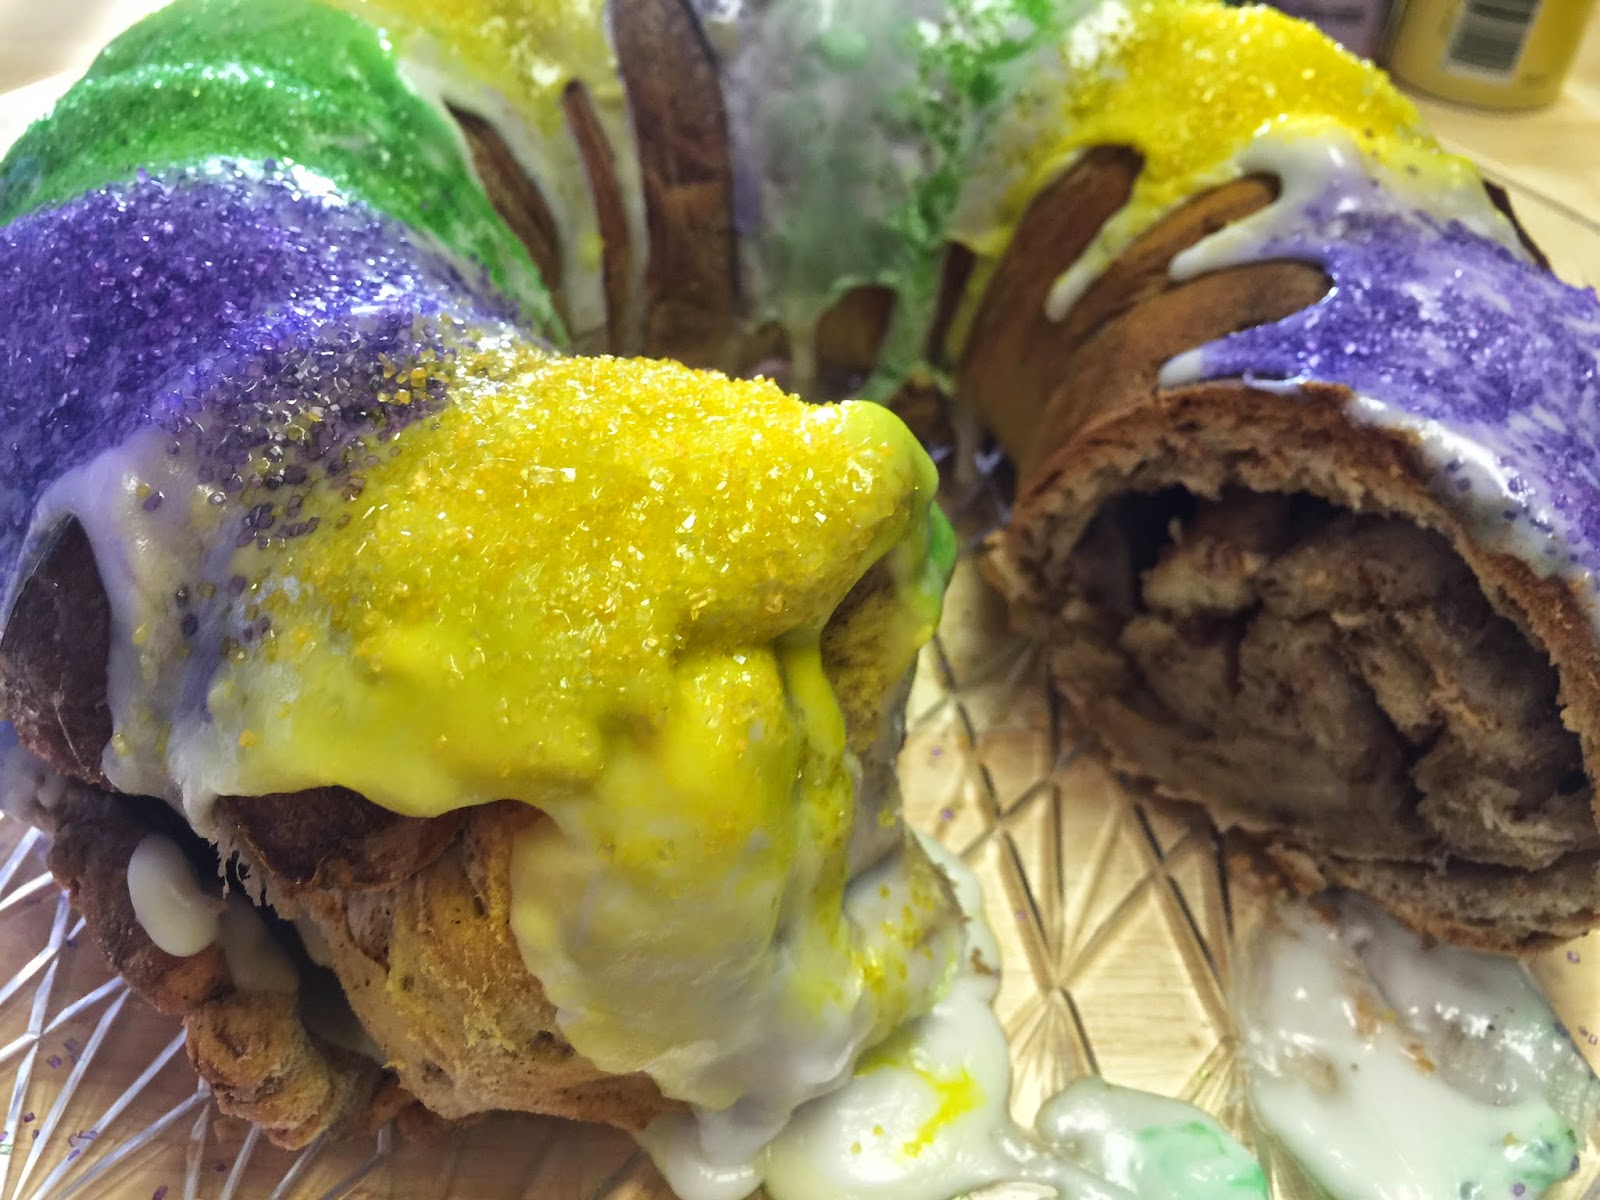

And even with it being slightly over-baked (it was NOT burned), this turned out fabulously! I cannot wait to do it again & I am now satisfied with my cake, whether it be Kinged or just Carnival.

Hope you enjoy trying this, too! BOOM!

Wednesday, March 12, 2014

Apple Irish Cream Cake Glaze

I always look forward to when I get to make my Apple Irish Cream Cake (recipe HERE). And I usually leave it alone since it's so pretty by itself...

Well, with St. Patrick's Day rolling around again, and we have a group coming to our house tomorrow night, I thought I'd make the cake for them.

As I did the cake this time, I realized something:
there is some ooey-gooey goodness from the apple slice marinade left in that bowl! So I decided I should use it! I decided to to make a glaze for the cake with it!

Here's what I did:

~~~~~~~~~~


IRISH APPLE CREAM CAKE GLAZE


Ingredients:

(leftover from the mixture from the apple marinade in the cake recipe)

1/4 C brown sugar
2 T apple pie spice
2 t lemon juice
1 t honey or agave
1 t buttermilk
1/2 t vanilla extract (optional)
1/2 t almond extract (optional)

     Also:
1 C granulated sugar
1 C powdered sugar


Directions:

~  after soaking & using the apple slices from the marinade mixture, heat the liquid in a small sauce pan on the stove until it comes to a rolling boil. Allow to boil for about a minute & then reduce to a simmer for just a moment, then remove from heat. Stir it up.
OR
You can have liquid in a microwave-safe bowl, and heat the liquid on highest power for about 1 & a half to 2 minutes. Remove from the microwave & stir.

~ Add in the granulated & powdered sugar until completely mixed.

~ Once cake is completely cooled, drizzle the glaze over the cake.

~ Top it with a shimmy-shake of powdered sugar

NOTE: You can also keep glaze on the side to top off 1 piece at at time as it's served

~~~~~~~~~~

I plan to be making this on St. Patrick's Day again, too. Plus I'm looking forward to fixing up another Irish feast. Stay tuned for some of the other dishes! (check out my Irish fare HERE)

Hope this helps you in planning & inspiration, too!

ENJOY!

Thursday, January 23, 2014

Scandinavian-Inspired Almond & Cardamom Cakes

I have been on this Scandinavian kick, lately. It all came from doing some research on Leif Ericsson Day, which I missed celebrating this last year, but I wanted be ready for the next time around.

As I had been researching...like I do...I started getting drawn to some of the foods & decor. I also discovered St. Lucia Day, and in researching, will be better prepared for next time around for it, too.

But I digress...

I have taken a liking to the Scandinavian culture & finding out about it. However, I am not Scandinavian at all (I don't think)...but I'm taking on some of the dishes like I have with my Irish dishes (find recipes HERE), but I do have a lot of Irish in me.

Again...I digress...

I took on some baking a few years ago, and really took a hold of the cupcake. But I would play with cake mixes. I've done a couple from absolute scratch, but if I can have a base already, just use it & expound upon it! Right?

Now, if you remember, I discovered the Scandwich, and have been playing, in a near obsessive manner here lately. (see what I've done HERE) But I wanted to try some of the desserts. I've cheated some pastries, but I wanted something different!

Now, I've got some bundt cake pans that I love making breads & cakes with...because they turn out so pretty! They are already presentable, or near presentable, just as they are right out of the oven. *sigh*

Quite some time back, I saw a pan with a set of 6 smaller bundts. So cute! It was like 6 top tiers of a wedding cake...but in bundt form! I really wanted a pan or two of these. Then, because it's my brain we are talking about here, I thought about calling them "baby bundtings"! hehe

So, I had asked for a pan or 2 on my Christmas wish list for the last couple of years. Imagine my surprise when I received a pan that contained 12 tiny bundts! *SQUEEE* I didn't know they made 'em so little! Then, later on Christmas...I got another one! I was so excited!!!

Cake mixes generally make about 24 cupcakes. I now had 24 itty-bitty baby bundtings so I could bake a whole batch at once! Woo Hoo!!

So, I started researching Scandinavian cakes to make...and hopefully, since there's a company called Nordic Ware (so fitting though the pan shape is not Nordic), I thought they were a perfect match...so I matched 'em up!

After doing some research & with my preference of cake mixes, I made some Baby Bundtings out of this:

~~~~~~~~~~


SCANDINAVIAN-INSPIRED 
ALMOND & CARDAMOM CAKES


Ingredients:

Baby Bundtings
1 box Pillsbury Traditional Vanilla cake mix
5 eggs
3 sticks butter, melted
1 1/4 C milk
2 tsp almond extract
2 tsp ground cardamom

Glaze Topping
1 C granulated sugar
1/4 C milk
1/2 T vanilla extract
1/2 t almond extract
sliced almonds


Directions:

Preheat oven to 350 degrees F

In a large bowl, put in the cake mix, eggs, butter, milk, almond extract & cardamom

With a standing mixer or hand-held mixer, mix all of these ingredients together until very well blended & completely moist

In your mini bundt cake pan (or cupcake/muffin pan), spray rub down with butter or shortening & flour, or spray with a cooking spray that has flour in it; I used the spray
* If you are using a cupcake pan, you can just use cupcake liners, if desired

Fill each space 2/3-3/4 full

Place the pan(s) into the oven & bake for about 18-23 minutes (depending on your oven), or until golden & a toothpick comes out clean

Once done, pull out of the oven & allow to cool for 10-15 minutes before removing from the pan (if using the mini bundts); if using a regular cupcake pan, allow to cool for about 5 minutes before removing from the pan

While cooling, in a small bowl, pour in the sugar, milk, and vanilla & almond extracts and stir well, until the sugar is dissolved; add in more sugar or milk until you have your desired consistency - and set aside

When cooled, remove from the pan & place each small cake into a cupcake liner (if not already in one)

Take a small spoon & begin to drizzle the glaze over each small cake

Sprinkle a few sliced almonds on top of each cake

Serve

Yield: up to 24 mini cakes/cupcakes

~~~~~~~~~~

Aren't they adorable? I was so happy with how they turned out! I used cupcake liners that resembled a Scandinavian-type pattern to give it a certain je ne sais quoi to match the feel. But you can, of course, use any you'd like.

You could use it as one big bundt cake, too, if you wanted.


As I was "testing" them (*wink-wink* someone's gotta do quality control), I realized how delicious they would be with a cup of coffee! What a great after dinner finisher! Or even after lunch...

ENJOY!

Wednesday, June 5, 2013

Spicy Mexi-Cocoa Cake with Brown Sugar Whipped Cream

Oh man, I have really been enjoying my Spicy Mexi-Mocha lately! (recipe HERE)

Cinco de Mayo was about a month ago, of course. We fixed up quite a Mexican fiesta! It did include the Cliantro Lime Black Bean & Corn Salsa! (salsa recipe HERE)

Now, I wanted to include a dessert, of course! I wasn't sure how a Mexi-Mocha would go over since we had the kiddos, too...so I wanted to do up just the Spicy Mexi-Cocoa. However, I didn't know how long it would take us to eat, how full we'd be, and how long the company we had over was gonna be able to stay. So I was thinking how I could get it to last. So...I BAKED IT! Right along the lines of my Apple Irish Cream Cake. (recipe HERE)

Yes, I turned it into a cake. And since I tend to use cake mixes to play with, I didn't want to add too much sweet stuffs to the mix. So I did something else with the brown & granulated sugar.

So, here's what I did:

~~~~~~~~~~


Spicy Mexi-Cocoa Cake with Brown Sugar Whipped Cream


Cake Ingredients:
~ 1 box chocolate cake mix
   ~ use milk instead of water
   ~ use butter instead of the oil & double the amount
   ~ add one extra egg than the box directions call for
~ 2 T cinnamon
~ 2 t ground black pepper
~ 1 1/2 t salt
~ 1 t nutmeg
~ 1 t ground cloves
~ 1 t ground cardamom
~ 1 t chili powder
~ 3 pinches ground cayenne pepper
~ 2 T vanilla extract
~ 1 t orange extract
~ 1 t anise extract


Cake Directions:

~ Preheat oven to 350 degrees F

~ Place all ingredients into a large bowl, and then mix together well

~ Spray or grease cake pan - I used my trusty bundt pan

~ Transfer cake batter evenly into the cake pan

~ Bake for approximately 45 minutes; check at around 40 minutes with knife or toothpick insertion

(while baking, make the whipped cream - recipe below)

~ Once baked thru, pull out of oven & allow to cool in pan for about 5 minutes

~ Carefully turn cake out onto cake plate or platter

~ Allow to cool for about 15-20 minutes & sprinkle with powdered sugar or cocoa powder

~ When slicing & serving, top each slice with a drizzle of honey & a dollop of brown sugar whipped cream:


Brown Sugar Whipped Cream Ingredients:

~ 1 C heavy whipping cream
~ 1/4 C packed brown sugar
~ 1 T granulated sugar


Brown Sugar Whipped Cream Directions:

~ Place ingredients into a medium bowl

~ With a hand-held mixer, whip ingredients together on medium until firm; about 5 minutes (do NOT over-whip)

~ May sprinkle a little cocoa powder or cinnamon on top, if desired ...or some chili powder if you want more spice


~~~~~~~~~~

OK...we didn't get to enjoy the cake on Cinco de Mayo. We were so full. But got to try it the next day. And...
Oh...My...Yum.

Just some chocolate, cake, sweet, and a little bite of spice...just so good!

Of course, not just for Cinco de Mayo, but also for Dios de los Muertos (Day of the Dead - November 1st & 2nd) or even September 16 &/or 27th.

For a little mocha variation, you can either do half a cup of strong brewed coffee & half cup milk in the cake batter instead of the 1 cup of milk, or you can make a glaze of powdered sugar, chilled brewed coffee & milk.

That slice you see in the above picture is mine! And it's already gone. I might grab me another...

ENJOY!

Wednesday, March 27, 2013

Apple Irish Cream Cake


For St. Paddy's day, recently, I wanted to find an Irish dessert. 

Getting  mint anything just wasn't cutting it! So...I researched... 

Then I came across an idea for apple cake. But I didn't have much chance to actually go get the ingredients. However...I discovered that I could cheat making one with a spice cake mix & apple pie filling! Guess what! I had both!! Woo Hoo! So I found a recipe involving both ingredients & adapted a more authentic-like, Irish-inspired apple spice cake!

~~~~~~~~~~~~~~~~~~~~~~~~


APPLE IRISH CREAM CAKE
(cheater cake using cake mix & pie filling)

1 box spice cake mix
1 can apple pie filling
6 T butter + 2 extra, softened
2/3 C sour cream
1/2 C Irish cream creamer (I used Bailey's non-alcoholic coffee creamer)
3 T buttermilk + 1 tsp extra
3 eggs
1 apple, cored & thinly sliced (I used Granny Smith with it's tartness)
1/4 C brown sugar
2 T apple pie spice
1 tsp honey or agave
2 tsp lemon juice
1/2 tsp vanilla extract (optional)
1/2 tsp almond extract (optional)

Directions:

Preheat oven to 375 degrees F. Empty contents of the spice cake mix, apple pie filling, 6 T butter, sour cream, Irish cream coffee creamer, 3 T buttermilk, and eggs into a medium size bowl. Hand mix until all contents are well blended & is completely moistened.

In a small bowl, put in the leftover butter, buttermilk, plus the vanilla & almond extracts (if using), brown sugar, apple pie spice, honey or agave, and the lemon juice. Mix well together & then add in the thin apple slices & coat. Take your rings off & use your hands to work the apples throughout the mixture.

Grease or spray bundt cake pan (I sprayed mine with Baker's Joy). Use about half of the apple slices & arrange them in a circle at the bottom of the pan. This will end up being the top, so think about how the top of your cake will look when arranging the apple slices. Once the slices are arranged how you would like them, spoon in the cake batter evenly around the pan. Now that the batter is in the pan, covering the arranged apple slices, use the other half of the apple slices to arrange for the underside of the cake by carefully setting the slices on top of the batter (like in the picture, above).

Once the cake pan & batter are both fully prepared, place in the oven. It will need to bake about an hour, depending on the oven. Check it at 45-50 minutes; it could take up to about an hour & 15 minutes. Keep doing the knife or toothpick test to make sure it's done.

When it is time to pull the cake out of the oven, let cake set in the pan for about 5-10 minutes. After that time, and some cooling has taken place, carefully turn the cake out onto a cake plate or cooling rack.

This cake is best served warm...and should be very, very moist! Slice & enjoy!

I'm sure you could add in actual Bailey's, too. Still would be yummy!

~~~~~~~~~~~~~~~~~~~~~~~~~~~~

If you want to do a caramel or whiskey glaze for the top, you can...but there is no need for it! I left it as is...


And my family has fallen in love with this apple cake!! I will be making it again. And beyond just St. Patrick's Day!


Hope you love it as much as we do!

ENJOY!