Showing posts with label chocolate. Show all posts

Tuesday, January 20, 2015

Tingling Leprechaun

I love my coffee.

Yes, it's my vice. And it's ugly when/if I don't get it.

I do whatever I can to include my coffee in celebrations, too. Because I will have it! So I may as well include it into whatever holiday celebration. Amm-i-rite?

Around Cinco de Mayo & Dia de los Muertos, I will make my SPICY MEXI-MOCHA.
Much along the same lines, I have been making an Irish-inspired coffee for quite a while now. I thought I'd shared it here already, but then realized I had not! So I will do it now!

I've been enjoying this coffee drink both hot & cold. And I usually have it about once a week, and increases in consumption as St. Paddy's nears.

I, personally, am not a fan of the over-cheesy, "if it's green, it must be Irish," kind of thinking. Even though I love me a Shamrock Shake, I am not big on green mint stuff being used for St. Patrick's Day, either. Why? Because it's not authentic! However, I make a slight exception in this case. Why? Well...there's always cocktails & other drinks created with the most fun names...some even with a purpose! I created this drink (a coffee one) in 2008 while having a lot of time & resources on my hands at a stress-free job I had gotten. I went to the kitchen & grabbed my coffee, Irish Creme hot chocolate mix & found a chocolate-mint starburst hard candy in the candy dish, on my desk...so, I mixed them together. It seemed like it would taste pretty good...and it did! So much so, I played & tweaked to create this drink I still have about once a week, to this day!

Here's what I do:

**********


TINGLING LEPRECHAUN


Ingredients:

* 1 C freshly brewed coffee (non-flavored...just a delightful blend of your choice)
* 2 T chocolate syrup
* 4 T Irish Creme creamer
* 1 1/2 T chocolate/mint creamer
   (like International Delight York-flavor or Coffee Mate Peppermint Mocha -
     I prefer I.D.'s Peppermint Chocolate Truffle,
     but theirs disappointingly seasonal at Christmas)
* milk or half & half creamer
* ice - if making the iced version
* whipped topping (optional)


Directions for Hot:

~ brew the coffee

~ in a large mug, add in the chocolate syrup and flavored creamers

~ when the coffee is brewed, pour in the hot coffee into the mug

~ fill the rest of the mug up with the milk (I will use chocolate milk sometimes) or half & half

~ stir it all up, adding the whipped topping (if using)

~ begin to sip the deliciousness


Directions for Iced:

~ brew the coffee

~ in a tall glass, add in the chocolate syrup and flavored creamers

~ add in ice to fill about 1/4 of the glass

~ once the coffee is brewed, pour coffee into the glass & stir (ice will melt)

~ fill the glass almost to the top with the milk (I will use chocolate milk sometimes) or half & half

~ stir the coffee drink well

~ carefully add in some more ice until coffee reaches top of the glass

~ add the whipped topping (if using) and a straw

~ begin to drink the deliciousness

Tip: Use chilled coffee so it won't melt the ice nearly as quickly!


Yield: 1

**********

As a note: you can adjust these amounts of ingredients depending on your own tastes. Cut down on creamers & add more coffee, if you'd like. Or just add a splash of coffee & enjoy the the other flavors. I'm not there to judge.

On Sunday mornings, we are rushing around getting ready for church. I will make the iced version in a BIG travel cup (using about 3 times the amounts here...cuz...coffee...and chocolate), and then I will use a packet of Carnation Instant Breakfast, in the chocolate flavor, instead of the chocolate syrup. Then it's my breakfast mocha! YUM!!

My usual Sunday morning Tingling Leprechaun iced breakfast mocha


Also, feel free to try regular Bailey's Irish Creme instead of just the creamer (and maybe a bit of coffee liqueur) for an Irish coffee kick! It's the perfect name for a cocktail, anyway!

Then you can go on with your day, like on St. Paddy's, where you are set & ready to take in the events of St. Patrick's Day, or even your own Irish fare (several recipes HERE)!

*CHEERS*

ENJOY!

Thursday, January 1, 2015

New Year's Day Dishes

So it's a New Year. You've been told you need to eat things like:
          Black Eyed Peas/Beans
          Pork
          Greens
          Circles

Amm-i-rite?

Now you've got those kiddos (or adults) who scrunch up their nose at you at the very thought. Right? We've all got 'em.

I enjoy making a one-dish-covers-all kind meal. And you can put those extra things in there without being full on detected. Much like the NEW YEAR'S HAM & BEANS I make. Seriously, there are some who wouldn't eat black eyed peas or kale (like I used last year), but when I put them in the ham & beans, those same people went back for seconds!

Happened this year, too. So glad! A newbie to my ham & beans said they were pleasantly surprised by the vegetable addition. And I added in extra dark red kidney beans as well as using collard greens instead of kale. Still so good...

You know, if you don't want to do ham & beans, I know some who will put these things into a chili! You can add bacon bits to the chili to cover the pork, too!

OK, I'm going to admit something to you. Until the beginning part of last year, I'd never heard of a thing called Hoppin' John. Seriously. Have you? Since it apparently involves rice, I thought of it as another option for those who don't want full-on ham & beans!

So I began to research. You know what I found out? Americans can sure screw things up! I found a lot of "traditional" Hoppin' John recipes out there, but as I dug further, I discovered it's not actually spicy & doesn't have a bunch of extra ingredients! It's also not supposed to be mushy. It's just simply supposed to be bacon (or ham or sausage) in beans & rice, cooked together, adding each ingredient at a different time. The only seasoning is maybe a little salt & some pepper. It's should be served with a side of collard greens, but since I'm a one-dish-covers-it kind of gal (remember?), I thought I'd add in some of the collard greens with the Hoppin' John.

Also, you can have small red peas/cowpeas that are basically red black-eyed peas! BOOM! Now they are interesting to look at, too.


Dried small red peas/cowpeas...see the black eyes??


Since I have a non-pork eater, I thought I'd add in some liquid smoke, butter, and then some turkey bacon bits. No, it's not pork, but we still worked in the bean & greens thing. So, there's that. And? My daughter LOVED it!! I asked her if I should add in some of the extra veggies & spices others have done, and she said no! She loved the comforting taste & feel of the dish. YAY! This is coming from a girl who doesn't even like beans...but she had several bowls of it! YAY!


Simple, non-pork Hoppin' John


I also had an idea! I had a wonderful, "awful" idea! Stay with me...

Since we have already been trying to eat better around here, and with the running my hubby & I have been doing, I really wanted a dessert that we could really enjoy, yet not feel horrible about! Many of the after-workout protein bars are already like a candy bar, so how could I give an awesome protein follow-up punch to a good run? BROWNIES! Right?

If you know me, you know I will celebrate about ANY holiday to the hilt! It's food, attire, activities, color schemes...everything. With the new year ringing in within hours, I was planning how this year could be different than last year.

Last year I became fully aware of the "Color of the Year," put out by Pantone (go figure), for the defining color of the new year...even with the definition!
Our family began a new tradition, last year, of starting the new year with a casual get-together with great, positive people while enjoying edible new year's traditions together. It was delightfully uplifting! I also decided to use the 2014 color of the year, Radiant Orchid, to decorate a tree with for display. We took down our other trees, but I left up a little tinsel tree adorned with purples, pinks, fuchsias...all in the Radiant Orchid color palette. It was a lot of fun to have up. So, we decided to renew the tradition for 2015!

The Color of the Year, from Pantone, is Marsala! Yes, like the wine. A deep, robust & earthy red-brown. It's very lovely. So I decided to focus on the color for this year's gathering. I left up a small tree to decorate in a lovely deep red with golds & greens, feathers & sparkle. It's rather elegant.

Along the same color lines, I decided to find more for the edible portion of the holiday. Much like those red black-eyed peas being a perfect fit! I'm also added those dark red kidney beans to the ham & beans, along with the Hoppin' John, of course, for the same reason. So why stop there? Why not with the brownies, too??

For the first time, this past year, I heard about bean brownies. Yes...the brownies where you add a can of black beans (or cannellini beans, etc.) to a brownie mix, or homemade brownie batter, for a fiber-filled, protein-filled yummalicious treat! Or so I've heard...
Well, I decided I would make a protein-packed, fiber-filled red velvet cake brownies!!

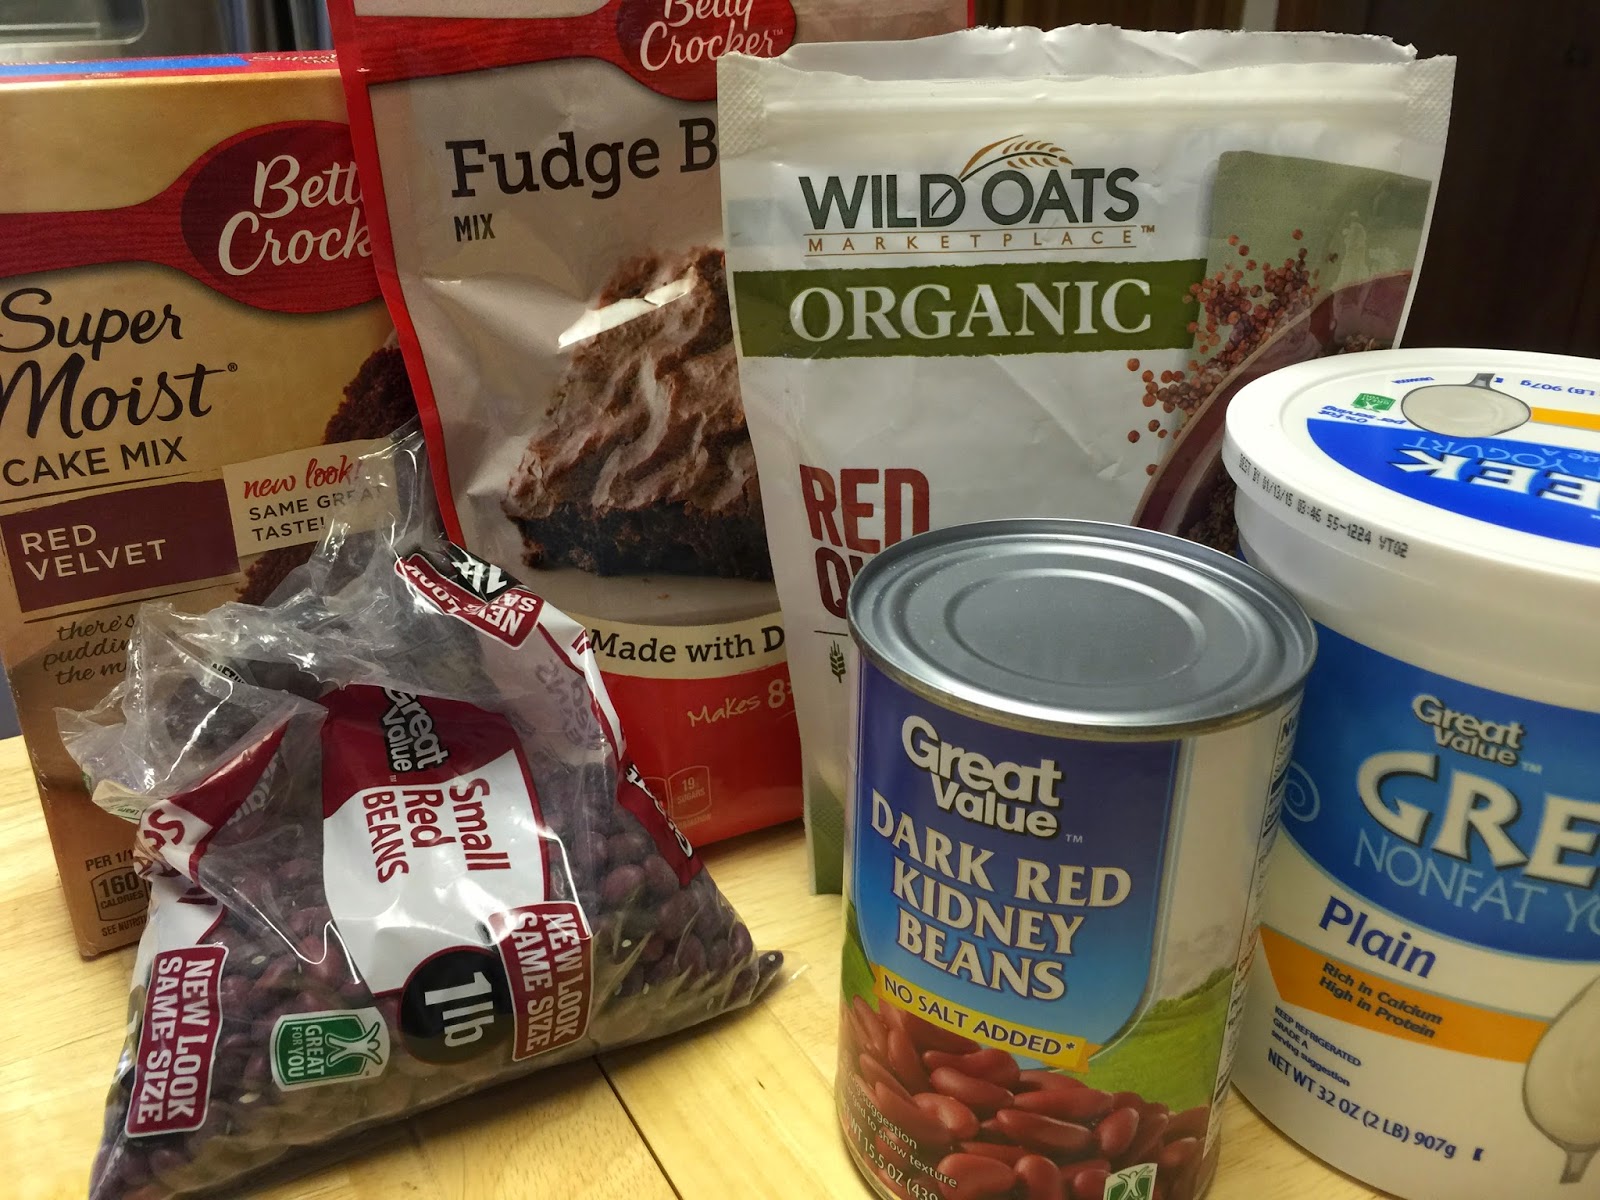
How can you go wrong with ingredients like these?


Here's what I did...

**********


RED VELVET PROTEIN BROWNIES


Ingredients:

* 1/2 lb. dried small red peas/cowpeas, soaked, drained & rinsed
* 1 can dark red kidney beans, NOT drained
* 1 C red quinoa
* 5 C water
* 1/2 C plain non-fat Greek yogurt (vanilla non-fat Greek yogurt for sweeter taste)
* 1 box red velvet cake mix
* 1 pkg fudge brownie mix
* 1 bag chocolate chips (dark best, but any will work) OR 1 bag peanut butter chips; divided
* 1/4 C natural creamy peanut butter (if not using peanut butter chips)

** Used a food processor and standing mixer for this recipe


Directions:

~ Soak dry beans in water, placed in the fridge, for about 8 hours

~ Remove beans from fridge, drain & rinse (check for pebbles)

~ Place drained & rinsed beans in a medium saucepan, then cover with 5 C water


~ Bring water in saucepan to a boil, then lower burner to low & cover with lid (kept tilted) and allow to simmer until beans are tender (abut 1 1/2-2 hours)

~ In the las 30 minutes of the beans cooking, add in the quinoa (you can rinse if you'd like, first - I didn't)

~ Once beans are cooked thru & the quinoa has expanded, take off the burner to cool for several minutes (may have standing water...which is OK)


~ Preheat oven to 350 degrees F

~ When the bean & quinoa mixture has cooled significantly, transfer to the bowl of your food processor

~ Open the can of dark red kidney beans, and add all contents into the food processor


~ Turn on the food processor (I used the chop setting) until mixture is a creamy consistency

~ Stop the process, open the food processor, then add the Greek yogurt


~ Close lid & start the food processor back up to incorporate the yogurt into the mixture

~ When all the beans, quinoa & yogurt are creamed together, stop the food processor

~ Put the contents of the cake mix & brownie mix into the bowl of the standing mixer


~ Transfer the bean mixture into the standing mixer bowl


~ Incorporate the mixes, chips & bean mixture on low in the standing mixer


~ Add in about 1/2-2/3 of the chocolate chip (or peanut butter chip) bag to the batter slowly

~ While it all mixes, spray a 9"x13" cake pan with cooking spray or lay down parchment paper

~ Once all the ingredients are good & mixed, pour it into the prepared cake pan - it will be thick! You will probably want to spread it with a rubber spatula.


~ Place the filled cake pan into the oven for about 25 minutes, until cake brownies are firm to the touch (may do the toothpick/knife test, but it may not come out completely clean)

~ While the brownies bake, melt the remaining chocolate chips with the peanut butter (or just the peanut butter chips); I put the remaining chips from the bag into a small bowl with the peanut butter, then put the bowl in a slightly larger bowl filled half-way with water, then placed in the microwave for 2 minutes - when done, I took out the bowl with the chocolate & peanut butter, then stirred them until completely incorporated & smooth (you may use a stovetop method if you so choose)

~ When the brownies are done, take out of the oven & allow to cool for about 10 minutes


~ Once the brownies are cooled enough to touch without burning yourself, carefully cut it up into smaller squares (I cut mine into 24 brownies)

~ Either with a spoon for drizzling, or placing the chocolate/peanut butter mixture into a small plastic storage bag with a tiny hole cut on the corner, begin to drizzle the mixture over the cut brownies

~ Allow to set for about 1 hour while the drizzle harden


~ Serve or keep covered with foil


** Perfect to grab with a glass of chocolate milk after your next workout

Yield: about 24 servings

**********

When I tried them, I had a partial bag of chocolate chips that I used for the topping. I didn't have any to put IN the brownies. Also, I used the plain non-fat Greek yogurt...I want to try the vanilla. Without the chocolate chips & extra vanilla flavoring, these are a rich consistency, but are not sweet at all! So if you are not big on sweets, and still want a treat for after your long run, well...here you go!

Either way...they are rich & have a great moist texture!


So, with a new year setting in, and if you have a resolution to begin getting in shape, or if you are looking forward to staying in shape, consider these to have as guilt-free muscle rebuilding! It's also a beautiful color that coincides with the 2015 color of the year!! YUM!! Plus, the beans, quinoa, Greek yogurt & peanut butter will give you a power-protein-punch!! BOOM!

Now have a happy & blessed new year!

Oh, and do me a favor and NOT tell my kiddos they were enjoying beans & quinoa for dessert! OK? Thanks...

ENJOY!

Monday, January 13, 2014

Smokey Mexi-Mocha Chili

My hubby makes great chili! I know a lot of guys (even gals) claim they have the best, but my hubby's is kind of different & so good. He makes a chili that's sweet & spicy.

OK...he tones down the spicy so I can eat it, but he puts in his own special ingredients. And I'm a sucker for the sweeter side of foods. Creamier, too. And his chili is more of a stoup (a Rachael Ray term for "thicker than soup & thinner than stew"). It's got a good, bold flavor that is sweet & savory.

It's important to know this about my hubby's chili, but let's jump to my own  ingredient search:

I love chocolate. No really...I. Love. Chocolate. And I will try all kinds to see if it's to my liking or not. One day, as I was searching the candy aisle at the grocery store, I discovered something that began my brain's wheels to start turning on overdrive. Lindt has a dark chocolate bar that contains chili pepper in it! Did you know that? And I questioned why...

Quite some time later, I learned that there are people who have added cocoa to their chili recipes. wha-WHA?? I know, right?

Then I got thinking about that chili chocolate bar from Lindt...
I had already been adding a square of it to my Spicy Mexi-Mocha (recipe HERE).

My hubby has talked about trying a Tex-Mex seasoning in his chili, and I remembered him saying that...so I got thinking about the whole spicy chocolate in chili, much like my Mexi-mocha. And, mocha includes coffee...so I thought I'd throw in some coffee, too! Because...well...I also LOVE coffee!! I. Love. Coffee.

Then a friend of mine put her vegan chili recipe out there. Imagine my shock when it, too, included coffee!! Since then, I had seen where a couple of chili recipe demos, on news segments, that also included coffee.

But...none of those recipes had included both chocolate AND coffee!! I had even tried to research other recipes that had those ingredients. Guess what I found! Nada...nothing...zip...zero. So, I was on my own.

I also love a smokey flavor to my chili, along with a lot of other soups & meats. So I thought I'd include it here, too.

So, after some research of spices & other chili recipes, and finally getting all the ingredients I needed for what I wanted to use, here's what I came up with:


~~~~~~~~~~


SMOKEY MEXI-MOCHA CHILI


Ingredients:

1 lb ground beef or turkey; browned, drained & rinsed
1 14.5 oz cans diced fire-roasted tomatoes

1 small can tomato sauce
1 small can tomato paste
1-2 can(s) black beans, drained & rinsed
1 can corn, drained (I used a can with no salt added)
1-2 sweet red bell pepper, deseeded & diced
1 beef bouillon cube
1½ cup dark roast/strong coffee, brewed
½ cup minced onion or 1 small sweet yellow onion, diced - divided
½ chili dark chocolate bar; broken into much smaller pieces

3 T cumin
2 T parsley
2 T oregano
3 T flour
3 T cinnamon
1 T nutmeg
1cup brown sugar
2-3 T vinegar
3 T liquid smoke
3 T smoked paprika
3 T chili powder
3 pinches ground cayenne pepper
1 pinch red pepper flakes
garlic powder to taste
3 T honey
3 T vanilla extract
½ tsp anise extract (you seriously don't want too much of this, but just enough to give umph)
2 tsp cardamom
2 T each: unsweet cocoa & dark cocoa
2 T sugar
1 T salt
1 T ground black pepper


Directions:

~ in a large pot, brown meat thoroughly, adding half the onions; drain, rinse & add back into the pot

~ turn heat to mid-high heat, then add the beans, corn, bell pepper, the rest of the onions, and tomatoes (sauce, diced & paste) to the meat; stir

~ add in the coffee, liquid smoke, honey & extracts, then stir

~ begin to add all the other ingredients, stir & allow to simmer for 20-30 minutes

~ stir again & take a test taste to figure out where you might want to adjust seasonings & such, depending on how spicy, sweet &/or smokey you want it, then allow to simmer again to get those flavors all blended


* if you cannot live without a couple shimmy-shakes of tabasco sauce or chipotle seasoning, put it in...they are very fitting for this dish
* serve with cornbread or tortilla chips; sprinkle the top with cheese &/or sour cream, if desired
* use it as a hearty dip at your next fiesta
*serving suggestion: ladle the chili into a pottery mug (or any mug)...cuz...mocha should be in a mug

~~~~~~~~~~

This a different, yet yummy flavor for a chili. Perfect for a cold night (cuz...uh...chili) &/or for something like Cinco de Mayo, Dios de los Muertos, or even a different twist to for your Navidad fiesta...or any other night.

There are some surprising ingredients in this chili, but I really did take lead from my hubby's chili & a yummy Mexi-mocha. I even used the mocha idea as the basis for my Mexi-cocoa cake, too (recipe HERE)!

I mean...in ancient times, cocoa was mixed with spices & peppers before sugar & cream. So this is right on track with all of that!

As for the pepper, you can also mix it up by adding orange &/or yellow to make it more festive, too.

ENJOY!

Monday, December 30, 2013

Rich & Creamy Cheater Hot Chocolate

My family began a tradition where, in the time between Thanksgiving & Christmas, each family member of the household would draw a number (before Thanksgiving) to decide which order we would go in to watch their Christmas movie & enjoy a Christmas treat of choice. Then the whole family partakes in the family member's indulgence.

When my turn came around, I picked one of my very favorite Christmas movies (based on my favorite children's book), "The Polar Express." Now, I was going to do a treat mixture of gingerbread cookies with eggnog. But when I realized my movie still hadn't been chosen & I had the chance to pick it...you gotta have hot chocolate with this movie!

So I took in the best of all of it! I brought back my Eggnog Mousse (recipe HERE) topped with my Gingerbread Streusel (recipe HERE). Since that's all edible, I made my drink of choice be hot chocolate!

My hubby had a pretty good idea of getting pre-made chocolate milk & heating it up. OK...not a bad thought. But I got thinking...this needs to be a decadent chocolate drink. But there wasn't a lot of set up time. So, here's what I made:

~~~~~~~~~~


RICH & CREAMY CHEATER HOT CHOCOLATE


Ingredients:

* half gallon pre-made chocolate milk
* 6-8 packets hot chocolate mix (without marshmallows)


Directions:

~ in a large pot, pour in the half gallon of chocolate milk

~ heat the milk on medium to medium-high heat to just boiling, stirring occasionally

~ once the milk has just hit boiling, reduce heat to lo to simmer & add in the hot chocolate packets

~ whisk vigorously until hot chocolate mix is dissolved

~ begin to ladle into mugs

OR

~ fill microwave-safe mugs with pre-made chocolate milk

~ place in microwave on high for one & a half to two minutes

~ pour in 1 hot chocolate packet into each mug, and stir vigorously


~ garnish your hot chocolate with marshmallows or whipped cream, if desired

~ serve


Yield: 6-8

~~~~~~~~~~


Oh-me, oh-my! This was so rich & chocolatey! And perfect for a super cold night with the family!

You're welcome.

Make it a cheater mocha! Pour in the chocolate milk instead of creamer with your coffee & stir in the hot chocolate packet. YUM!

ENJOY!

Saturday, August 10, 2013

Fake-Out S'Mores

Hey, everyone! Happy National S'mores Day! *glitter confetti cannon*

Have you had the chance to have some s'mores yet this year? Many look at them as a summer staple to go with camping & such. Since there is toasty fire involved & marshmallows make me think of hot chocolate, I like to think of them as more of a fall-season staple. Either way, they are delicious anytime you can work eating them!

If you remember, I made summer camping trail mix that is based on s'mores. (link to the recipe HERE) But I know it's not right in line with a true s'more.

Not too long ago, my family went on vacation to Colorado. We stayed at the Keystone Resort. We found out that every Wednesday night, they offer a free-to-all campfire social. The campfire social does have food available for purchase...but...they have FREE offerings of s'mores! Being on a budget, we just took in the s'mores. But there's were...uh...er...um..."different".

They used a cheater way of part of it. You could still roast your own marshmallows, but they appeared to have a Nature Valley sponsorship happening. So it wasn't really graham crackers & chocolate squares...it was more like granola thins with a chocolate-coated layer of chocolate.


Don't get me wrong, still pretty good. And my daughter was totally taken by these little snack squares. And while the boys were off doing their own camping thing, my daughter & I decided to fake some s'mores one night. We used the Yahoo! Shine version (you know...the one that made folks grumpy - link HERE) to inspire & make some of our own munchies at home.

Here's what I did:

~~~~~~~~~~


FAKE-OUT S'MORES


Ingredients:

~ 1 box Nature Valley Granola Thins (we used the dark chocolate variety this time)
~ 1 pk Jet-Puffed StackerMallows


Directions:

* Place oven rack as far to the top as possible & turn the oven onto broil (I set mine on HIGH)

* Lightly spray a cookie sheet with cooking spray or lay down some parchment paper

* Open up individual granola thins & place on the cookie sheet with chocolate side up

* Place one stackermallow on top of each chocolate granola thin


* Place the cookie sheet onto the top rack in the oven

* DO NOT WALK AWAY! Watch for the browning of the marshmallow - I left mine in for maybe 2 minutes!


* Pull the cookie sheet out of the oven once the marshmallow has the perfect golden-to-brown color for you

* Either place a separate granola thin on top of each marshmallow OR stack up a marshmallow layer on top of another marshmallow layer for a thicker s'more


* Squish together & consume

~~~~~~~~~~


Does this totally make up for a good campfire s'more? No. But they were still pretty tasty!

Don't get me wrong...I'd rather have the graham crackers, chocolate squares & fire-toasted marshmallow...but sometimes you just gotta make something else work.

So here is just another way to celebrate National S'mores Day.

ENJOY!

Wednesday, July 3, 2013

S'More [Bacon] Trail Mix

It's summertime, people! That means there has been more baseball tournaments kicked up or attending your favorite baseball team's game(s), swimming, vacations, and...camping!

Now then, I'm not what you'd call an "outdoorsy person". I will go camping, but I'm picky about it. I will go in the woods, but it had better be in a camper...or better yet...a cabin. I'm not a fan of the heat & needing to apply 8 layers of super high sunscreen. I feel like I put in my dues doing years of tent camping on family vacations as a kid. From KOA to KOA as we'd go from state to state. I'm in a different phase of life & would prefer the indoors now.

I will make a few exceptions, however. I love a cool morning on the deck with my coffee in the peaceful stillness while smelling the moisture of the dew as it accentuates the green smell of the grass & leaves. Or, if at the lake since my hubby & sons love the camping scene, I love going out with the early morning fishers in the boat. It's quiet, still, peaceful listening to the water. Yeah...that.

But I'll admit that I do love a good campfire/bonfire/firepit going. I do love roaring & crackling of the fire while roasting up marshmallows...and even more so adding the marshmallow to graham crackers with chocolate. Mmm-mmm-mmm...gimme s'more of that!

Now then, since not everyone enjoys that scene, I came up with a cheater to-go s'mores that anyone can have at nearly anytime!

As it turns out, there was recently quite the baconfest going on in Colorado. Mmmmm...bacon...
So my hubby would keep me up to date on what was going down at the baconfest. And one of the things served was bacon s'mores! BACON S'MORES, people! WHAT??? Mmmmmm...

My hubby has been kind enough to make me chocolate covered bacon before. Yeah...only part of why I love him. And if you can have chocolate covered bacon...why not add some marshmallows & graham? Right? So I started researching & decided to make it a fun trail mix!

So, here's what I did:

~~~~~~~~~~


S'MORE [BACON] TRAIL MIX

Ingredients:

~ 1 C Golden Grahams cereal
~ 1 C Teddy Grahams (honey flavor)
~ 1/2 C Milk Chocolate Chips (I used Hershey's)
~ 1/2 C Milk Chocolate M&M's
~ 1 C mini marshmallows
~ 1 C mini marshmallow bites (little dehydrated ones)
~ 1/2 C bacon bits


Directions:

* Place all the ingredients into a large bowl

* Mix together

* Consume


+ Yield: about 9 servings of about 1/2 a cup each


~~~~~~~~~~

I love the idea of the different textures & the presentation of this trail mix. There's still the graham in the cereal, the marshmallows & the Hershey chocolate for the traditional look of the s'more. You can always stop at those ingredients if you'd like. But I wanted to bump up the color, the sizes...plus...I had to add the bears for the woodsy-campy feel! Oh...and...uh...BACON!


You can always use turkey bacon bits or imitation bacon bits, too. Or you can leave out the bacon all together if it's something you think is too weird.

Something else you can do for a switch up is by adding nuts or seeds of sorts. You can also maybe use Reece's Pieces or peanut butter M&M's if you want to add a bit of the nutty taste to the mix. You can even add mini pretzels or pretzel sticks, also! Or switch up the chocolate to dark chocolate or white chocolate for something different.

And? You can enjoy them while camping, while on the go, when out watching fireworks, or just while watching the TV from your couch or from inside your blanket fort in the living room. It's S'mores-to-go, people! It's not gooey...the only real mess you'd make is if you spilled it. But it's still easy clean up!

*Note: Use just the M&M's or hardshell candy if you plan on being in the heat for a while.

The jar on top as no bacon.
The jars below are marked with "B" since the have bacon.

Oh...and just store in snack-size plastic baggies, or small jars (like mason jars or reuse baby food jars to hold it). Then you can just pick up some s'more snacking & head out the door! Or it's easy transport when you go camping. Recharge some childhood-like memories with this mix! S'mores, M&Ms, Teddy Grahams, marshmallows...I mean...C'mon!

ENJOY!

Wednesday, June 12, 2013

Rum Cannon Balls

About the same time that I did up the RUDOLPH NOSE CANDY, I wanted to make some rum balls, too.

But I wanted to make 'em right, but also needed them for a wide variety of ages...cuz, you know...kids. So I made a couple of different ones. And they are SO easy! Messy...but easy...oh...and yummy!

Oh, and they remind me of cannon balls (more explaining on that in a moment)!

So I bring you:

~~~~~~~~~~~~~~~~~~~~~~~


RUM CANNON BALLS

Ingredients:
* Brownie mix - made to package directions
* 1/4 C spiced rum - if making for the big kids (21+)
* 1 T rum flavoring/extract - if making for a wide range of ages
* Edible glitter or decorating sugar

Directions:

~ Bake brownie mix to package directions

~ Once out of the oven & baked, let cool for about 10-15 minutes

~ Take a spatula or spoon & break up the baked brownie into crumbly pieces

~ Add in the rum (flavoring) & mix it all up

~ Remove any rings from your fingers & dig into the mixture to form brownie balls, about 1" in size

~ Take each ball, after formed, and roll in edible glitter/sugar

~~~~~~~~~~~~~~~~~~~~~~~~~~~~~~~

I made both kinds. And I gave color distinctions so the kiddos wouldn't consume the wrong ones! The white sugar crystals designated the free-for-alls; the gold sugar crystals designated the one for big-kid-only consumption.

So hoping to make these again. And since they remind me of cannon balls, and with Captain Morgan being used, I want to make these for International Talk Like a Pirate Day, too! (That would be September 19th, if you're keeping score.)

ENJOY!

Wednesday, June 5, 2013

Spicy Mexi-Cocoa Cake with Brown Sugar Whipped Cream

Oh man, I have really been enjoying my Spicy Mexi-Mocha lately! (recipe HERE)

Cinco de Mayo was about a month ago, of course. We fixed up quite a Mexican fiesta! It did include the Cliantro Lime Black Bean & Corn Salsa! (salsa recipe HERE)

Now, I wanted to include a dessert, of course! I wasn't sure how a Mexi-Mocha would go over since we had the kiddos, too...so I wanted to do up just the Spicy Mexi-Cocoa. However, I didn't know how long it would take us to eat, how full we'd be, and how long the company we had over was gonna be able to stay. So I was thinking how I could get it to last. So...I BAKED IT! Right along the lines of my Apple Irish Cream Cake. (recipe HERE)

Yes, I turned it into a cake. And since I tend to use cake mixes to play with, I didn't want to add too much sweet stuffs to the mix. So I did something else with the brown & granulated sugar.

So, here's what I did:

~~~~~~~~~~


Spicy Mexi-Cocoa Cake with Brown Sugar Whipped Cream


Cake Ingredients:
~ 1 box chocolate cake mix
   ~ use milk instead of water
   ~ use butter instead of the oil & double the amount
   ~ add one extra egg than the box directions call for
~ 2 T cinnamon
~ 2 t ground black pepper
~ 1 1/2 t salt
~ 1 t nutmeg
~ 1 t ground cloves
~ 1 t ground cardamom
~ 1 t chili powder
~ 3 pinches ground cayenne pepper
~ 2 T vanilla extract
~ 1 t orange extract
~ 1 t anise extract


Cake Directions:

~ Preheat oven to 350 degrees F

~ Place all ingredients into a large bowl, and then mix together well

~ Spray or grease cake pan - I used my trusty bundt pan

~ Transfer cake batter evenly into the cake pan

~ Bake for approximately 45 minutes; check at around 40 minutes with knife or toothpick insertion

(while baking, make the whipped cream - recipe below)

~ Once baked thru, pull out of oven & allow to cool in pan for about 5 minutes

~ Carefully turn cake out onto cake plate or platter

~ Allow to cool for about 15-20 minutes & sprinkle with powdered sugar or cocoa powder

~ When slicing & serving, top each slice with a drizzle of honey & a dollop of brown sugar whipped cream:


Brown Sugar Whipped Cream Ingredients:

~ 1 C heavy whipping cream
~ 1/4 C packed brown sugar
~ 1 T granulated sugar


Brown Sugar Whipped Cream Directions:

~ Place ingredients into a medium bowl

~ With a hand-held mixer, whip ingredients together on medium until firm; about 5 minutes (do NOT over-whip)

~ May sprinkle a little cocoa powder or cinnamon on top, if desired ...or some chili powder if you want more spice


~~~~~~~~~~

OK...we didn't get to enjoy the cake on Cinco de Mayo. We were so full. But got to try it the next day. And...
Oh...My...Yum.

Just some chocolate, cake, sweet, and a little bite of spice...just so good!

Of course, not just for Cinco de Mayo, but also for Dios de los Muertos (Day of the Dead - November 1st & 2nd) or even September 16 &/or 27th.

For a little mocha variation, you can either do half a cup of strong brewed coffee & half cup milk in the cake batter instead of the 1 cup of milk, or you can make a glaze of powdered sugar, chilled brewed coffee & milk.

That slice you see in the above picture is mine! And it's already gone. I might grab me another...

ENJOY!

Wednesday, May 8, 2013

Rudolph Nose Candy

This past Christmas, since my family decided to indulge in more holiday treats of their choice, I decided to dive into making some of the treats any given family member selected...and then some!

I found a recipe for a very simple candy to make: Reindeer Noses. This past year was the 1st time I'd ever heard of or seen them...but they seemed to be everywhere! And since the seemed so easy, I thought of adding them to my foodie repertoire.

Now I have seen several version of this. But they all involve a small pretzel base (preferably round), a small milk chocolate candy (I've seen Hershey Kisses/Hugs & Rolos used), and then a topper of sorts - like a single M&M, a candy corn or pecan. I have seen them used & posted for all kinds of holidays, too...

But this time...I wanted to make the Christmas ones! But I ran into a couple of problems when I went shopping for ingredients:

1. I couldn't find the holiday M&M's. I really wanted a lot of red.
2. I couldn't get a hold of any round pretzels.

*sigh*

So I had to make due...and had to get my brainy-brain working quickly.

After some quick thinking...here's what I came up with:

~~~~~~~~~~~~~~~~~~~~~~~


RUDOLPH NOSE CANDY

Ingredients:
~ small pretzels
~ 1 bag of Rolos
~ maraschino cherries, halved

Directions:
Preheat oven to 325 degrees F.

Either coat cookie sheet (preferably one with a lip around the edges) with cooking spray OR cover cookie sheet with parchment paper.

Cover the cookie sheet with a single layer of small pretzels.

Set a Rolo on top of each pretzel.

Place in the oven for about 3-5 minutes.

While the Rolos are still warm & squishy, quickly place a cherry half on top of each Rolo & smash it down.

Let the candy set for about 10 minutes to cool & set up.

Carefully remove each "nose" candy from the baking sheet & place on a serving plate or platter.

Store in a air-tight container.

~~~~~~~~~~~~~~~~~~~~~~~~~~~

These are so easy! Even the kiddos can help you make them!

Plus...this version of the candy is sweet, salty, crunchy, chewy, chocolaty, fruity...and so darn adorable! My family could not stop eating these! They went very quickly. Even after 2 or 3 batches...they didn't last very long at all.

For some different options, you could use about any variety of Hershey's Kisses or Hugs, Reece's mini peanut butter cups, or a Dove Promises variety.

As for how long to store them for...I don't know. They didn't last long enough for me to figure it out!

ENJOY!

Wednesday, May 1, 2013

Spicy Mexi-Mocha (Mexi-Cocoa)

I love me my coffee. I love me some chocolate. I love me some Mexican food...Americanized or not. And I started diving into researching some Mexican culture when I was totally drawn into the Day of the Dead celebrations.

It was terribly exciting for me to find out that hot chocolate was go-to beverage in Mexico! So I came across a lot of different recipes for coffee & hot chocolate. I love me a good mocha...and I tend to cheat a mocha often. I will add an envelope of hot chocolate to my coffee. And it suffices. Perfect? No...but it is easy & I will drink it!

After I found these different recipes, I came up with my own easy & spicy Mexi-mocha concoction & would like to share it with you...

~~~~~~~~~~~~~~~~~~~~~~~~~~


SPICY MEXI-MOCHA


Ingredients:
1 C brewed coffee
1/4 C milk
1 envelope hot chocolate mix
1 T vanilla extract
2 T brown sugar
1 t ground cardamom
1 t cinnamon
1/4 t nutmeg
1/4 t ground cloves
pinch ground cayenne pepper
pinch chili powder
2 T honey
1 T granulated sugar

Directions:

* Once brewed, pour about a cup of coffee into a large mug.
* Place the contents of the hot chocolate into the coffee, then stir to dissolve.
* Add the milk, and stir.
* Add all the other ingredients, stir very well.

Top with a dollop of whipped topping & maybe sprinkle some cocoa or cinnamon for garnish. (the above picture has whipped topping & a sugar/cocoa/coffee bean mix from a grinder)

Serve.

** Makes 1 serving

NOTES: If you want an iced version, make sure the brewed coffee is chilled first, dissolve the hot chocolate mix in hot milk, and be sure to add plenty of ice and enjoy it from a larger glass!

If you want to leave out the coffee & make it the MEXI-COCOA, replace the coffee with boiling water or hot milk. BAM! Spicy Mexi-Cocoa!

A small splash of orange extract/flavoring or a tablespoon of orange juice gives a nice twist to this drink, too...hot or cold! You can also add some ground anise seed or a small splash of it's extract for a little more licorice...if that's your preference.

You can also put all of this (minus whipped topping) into a jar or bowl with a lid, shake it up & then strain into a mug or glass if you don't want the seasoning sediment. Then you can add the whipped topping...

Once in a while...if I have it on hand...I really love adding a square of Lindt Chili Dark Chocolate & allow it to melt in there, too. Seriously! YUM!! (like I did just this morning)

~~~~~~~~~~~~~~~~~~~~~~~~~~~~

See? Just in time for Cinco de Mayo! Or the actual Mexican Independence Day on September 16th...or on Day of the Dead on November 1st-2nd.

Oh...and I like to make this from time-to-time...just because. It's that yummy!

ENJOY!