Saturday, September 28, 2013

Lazy Cooker Chicken & Noodles

Things are beginning to cool down, and autumn is beginning to rear its head just a bit. This is my favorite time of year! I love fall so much! And I do mean everything about it. EV-ER-Y-THING!!

It also gets me excited to start switching over some of the dinner items served, too. We are still in the transition time in our house: we still grill, but it's time for soups & things in the lazy cooker, too! Have I mentioned that I love this time of year? Just checking...

Now then, our lazy cooker still works just fine, but the handle is falling off...and...well...it's one we got as a wedding gift in 1996. So, we've had it a while. But we haven't been using it as much as we probably needed to until last year.

And since I've been using the lazy cooker (see some of the recipes HERE), my hubby has decided to start putting some of his barbecue meat in the lazy cooker, too. So it's gonna get more usage this time around!

My hubby & I laugh at our changing excitements & wants as time goes by. Nowadays, the thought of a new refrigerator, a fancy washer & dryer, or even a new & updated lazy cooker is drool-worthy! (Yeah...I don't know who I've become, either! But I digress...)

I have been so impressed with the oval lazy cookers that can hold more than 4 quarts of stuff, has a timer, buttons, and a locking lid. And then we went out & found one! Just in time to do a couple of lazy cooker meals this week! WOO HOO!!

Last year, I found this recipe on Pinterest, HERE, for lazy cooker chicken & noodles. Sounded good to me! But I, of course, wanted to make a couple of tweaks to it. I just felt the need to boost some of the overall nutritional value, too.

So, here's what I did:

~~~~~~~~~~


LAZY COOKER CHICKEN & NOODLES


Ingredients:

~ 3 lbs boneless chicken (breasts, tenders, etc.; fresh or frozen - but thawed if frozen)
~ 42 oz chicken broth/stock or water with 4 chicken bouillon cubes
~ 4 small or 2 large cans cream of chicken soup
~ 2 celery stalks, diced
~ 1 carrot stick, diced
~ 1/4 C minced onion
~ 2 handfuls parsley (I used dried)
~ 2 handfuls coleslaw mix (optional)
~ 1 stick butter, thinly sliced
~ 1 handful flax seed (optional)
~ 2 bay leaves
~ 1 bag egg noodles


Directions:

* in the clean ceramic insert, spray the entire inside with cooking spray


* place the (thawed) chicken in the bottom of the insert


I forgot the minced onion here, but I add it in later;
go ahead & add it in on this step
* add in the carrot, celery, minced onion, parsley butter, cabbage/coleslaw (if using), and flax seed (if using)


* cover everything with the chicken broth/stock or water & bouillon cubes (I didn't have enough broth, so I added some water & added 2 bouillon cubes)


* add in the cans of cream of chicken soup


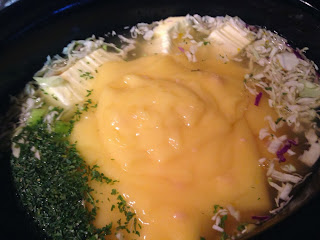
* give everything a good stir, add the bay leaves, close the lid & set the lazy cooker on low for 8 hours


* when 8 hours is up, remove the bay leaves, make sure the chicken is good & chunked into shreds & pieces


* add in the bag of egg noodles (I used whole grain noodles), give it all a good stir & allow to cook on low for about 45 more minutes


* give everything a good stir & serve


Yield: 8-10
~~~~~~~~~~

Tonight was the first time I added the cabbage & flax seed. Guess what! You couldn't taste the difference! So I upped the nutrition & fiber factor without changing the taste. Plus, we've been trying to up the fiber intake in many of our foods, so we have bumped up as much of the whole grains as we can, and I have been sneaking flax seed into a lot of things...and the family doesn't even know! I also used low sodium & heart-smart soups & broths, too. But I always love the color additions of the soup staples of the carrot/celery/onion mix. And I add dried parsley to a lot of dishes (even in eggs)!

As for the taste...it's supposed to be bland! It's supposed to be just a rich & creamy, stick-to-your-bones kind of meal. No need to add a bunch of pepper or salt...or hot sauce. Just allow it to make you feel good.


I just baked up some little homestyle biscuits, and we were happy. My 8 & a half year old had 2 bowls of dinner tonight! I think it went over well...and was so excited to be fixing it again! It also reheats well for lunch the next day or two.

Oh...and loved this 1st time out with the new & fancy-schmancy lazy cooker! Can't wait to use it again...and I'll now take it off my Christmas Wish List (for real)...

So...HAPPY FALL, Y'ALL!!

ENJOY!

Friday, September 20, 2013

Fish on a Plank

I love holidays. So much. And when even a little-known holiday comes around, I give it the attention it deserves! This includes activities, attire, and (of course) the food!

One of my favorites is a fun holiday that is gaining speed in notoriety is International Talk Like a Pirate Day! Every September 19th, talk like a pirate. How fun is that? Then you can take it a step further by dressing like one. I wouldn't advise totally acting like one (just pretend you're acting like one). And then, here's more fun: EAT like a pirate!!

I really do think thru what to eat on holidays. And I like to combine some authenticity with fun. And my thought process may start small, I do a little research...and then something happens: my brain starts making connections. Sometimes it ends up with me giggling...like this one...

Pirates would eat seafood, amm-i-rite? And they might make a person they aren't so happy with walk the plank, amm-i-rite? And there are cedar planks made for grilling fish...amm-i-rite???

OK, so I had this crazy-hilarious-cool idea. Are you ready for this insanity?

Well...here's what I made my hubby do:

~~~~~~~~~~


FISH ON A PLANK


Ingredients:

~ 4-6 fish fillets, fresh or frozen (if frozen, make sure fillets are thawed)
~ about 4 lemons, sliced (about 4 slices per fish filet)
~ 1-2 spring rosemary or thyme per filet
~ seasonings: we used lemon-pepper seasoning (you can add fine sea salt, too)
~ cooking oil like olive oil (not spray)
~ melted butter (may or may not need)
~ wood planks - we bought cedar planks that fit 2 fillets per plank


Directions:

* soak wood planks in water for at least 1 hour

* make sure grill is cleaned & preheated

* rub planks with cooking oil

* place fillets on the planks, and add seasoning

* arrange planks on the grill, cook for about 10 minutes with cover closed

* if fish is looking a bit dry, lightly baste with melted butter

* arrange herb sprig(s) & lemon sliced on top of each fillet

* close cover & allow to cook on the grill for about 10 more minutes

* when done, remove planks from grill & serve

Yield: 1-2 fillets per person


~~~~~~~~~~

OK, I want to let you know about how far my brain went. Since I wanted to have my hubby try this on International TLAP Day...the fish to use was obviously TiLAPia! Amm-i-rite? And the citrus in the lemon would help ward off scurvy! Amm-i-rite?

So, yes...that's what we used. And we got frozen tilapia and did 6 fillets. They were beautiful! And? They were so delicious!!

I didn't know how it would turn out, but the whole idea was making me giggle. And my hubby loves grilling, but had never tried fish on a plank. So this was exciting & nerve-racking for the both of us. So glad it was great! And we may keep this on our upcoming menu...and next time may be with salmon! YUM!

And these beauties were served with "Seaweed Salad" (baby spinach & baby kale mix tossed in a splash of lemon juice & sea salt) and some gold potato quarters with butter, lemon juice & sea salt. Plus some sea salt flavored along with lime & pepper flavored rice crisp crackers. Because that's what Polly might want! Amm-i-rite? And I didn't have any hard tack. That will be done at a future time.


Even better...this is a a quick & super easy meal...that is really good for you, too!! There is so much win in this dish!

As a serving idea: use 1 fish fillet on the plank & use the plank as your platter for serving the meal! All fancy & contemporary looking. You'll look like a culinary genius!

For dessert...we had the free dozen Krispy Kreme doughnuts that were given away for dressing like a pirate. But might I suggest my Rum Cannon Balls? (recipe HERE)

A couple more pirate-based recipes to come soon! Stay tuned for those...

ENJOY!!

Tuesday, September 10, 2013

Irish Bread & Butter Pudding

When I say I love getting in touch with the Irish side of my heritage, I'm not kidding! (find some of my other Irish [based] recipes HERE)

I finally got around to trying an Irish dessert I've been wanting to try...since...like...late February or early March. Now that it's September, there's no better time than now! Amm-i-rite?

With fall being right around the corner, I want to attempt to increase the overall foodie repertoire for the cooler months.

I do try to keep the authenticity of dishes like this. So I did some serious research into some different variations, and came up with one that worked the best for me to make.

So, here's what I did:

~~~~~~~~~~


IRISH BREAD & BUTTER PUDDING


Ingredients:

~ 8-12 slices slightly stale/dry white bread, crusts removed & set aside
~ butter
~ 1 C sultanas (plumped golden raisins) or other dried berries/grapes
~ 2-3 T sugar
~ 2-3 T cinnamon
~ 2-3 pinches nutmeg
~ 1 C heavy whipping cream
~ 1 C milk
~ 3 eggs, lightly beaten
~ 2 T vanilla extract


Directions:

* In a glass or ceramic dish (about an 8x8), spray the bottom & sides with cooking spray; I used a pottery casserole dish (that has family story)...it has a great look & fit with what I wanted to do, but I would recommend a squared off dish

* Place the raisins (or other dried fruit) into a small bowl or large coffee mug & cover with hot water for about 10 minutes; this will help plump up the dried fruit a bit to form the sultanas

* Take your bread slices & remove the crusts (set crusts aside - will use in a little bit), cut each slice down the middle (either into rectangles or triangles...but this step is optional: you may leave whole); I have an old Pampered Chef gadget that can make uncrustable sandwiches, so I used it to make my slices round & pretty to fit into my round dish - again, just make it easy

* Butter one side of 4 slices of the bread & place butter-side-down in the baking dish overlapping slices just a bit

* After the 10 minutes of soaking is up for the raisins (now sultanas), drain & sprinkle a few over the top of the bread layer

* Sprinkle about a tablespoon of sugar, a tablespoon of cinnamon & a pinch of nutmeg over the fruit layer & covering the top of the entirety of the bread slice layer

* Repeat the bread buttering step

* Sprinkle with more sultanas (plumped raisins or other dried fruit)

* Repeat the sugar, cinnamon & nutmeg step

* If you are doing a 3rd layer (I did), then repeat the last 3 steps one more time, otherwise move on to the next step

* In another bowl, whisk together the heavy whipping cream, milk, lightly beaten eggs & vanilla extract; pour mixture over the bread slice layers

* Set baking dish to the side for at least 1 hour, or place in refrigerator overnight

* When ready to bake the bread pudding, set oven to 350 degrees F

* You will want to place your baking dish in a bain marie (it's like a hot tub for the pudding in a sauna...spa time for the baking dish!)
Place the baking dish into a larger baking dish that will hold the pudding level; pour water into the larger baking dish - enough to go half way up the pudding baking dish. This will keep the cooking even throughout the dish for pudding

Prepping the Bain Marie
* Allow to bake in the center of the oven for about 1 hour

* After the hour is up, pull bain marie out of the oven & allow to cool for a few minutes, then remove the baking dish from the bain marie to cool a bit more from there

* Serve warm with a topping of whiskey sauce or whipped cream

* Top with a sprinkling of bread crumbs made from the cut off crusts from the bread slices:

   Bread Crumb Directions:

# Set oven to 400 degrees F
# On a baking sheet, spray liberally with cooking spray
# Lightly cover baking sheet with a dusting of cinnamon & a sprinkling of light brown sugar
# Arrange crusts in a single layer on the baking sheet
# Spray tops of crusts liberally with cooking spray
# Lightly cover the crusts with a dusting of cinnamon & a sprinkling of light brown sugar
# Bake for about 10 minutes
# Crusts should be hard & crispy
# Allow to cool for a moment & then crush the crusts into a near dusting or pulverize them in a food processor to make crumbs for sprinkling


~~~~~~~~~~

Irish Bread & Butter Pudding
with Irish Cream not-so-whipped topping "sauce"
and bread crumb topping


I have been wanting to make this dessert for quite some time...and it was so worth the wait! Oh, it's SO good!!

This is also another dish that terrifies my kids, and my hubby automatically said he won't do bread pudding. *sigh* I need to find folks to share this with. I am so happy with how it turned out!

It's certainly a perfect dish to have ready for St. Paddy's Day, but I would also love to make a more Christmas-y version using Craisins, and then maybe topping it with cranberry sauce.

This is also a great way to figure out how to use up some of that day-old bread, or the loaf that's close to it's Best By date. Don't let any of it go to waste!

There was a lot of time put into this dessert...but it really was easy!

I might even try this with our wheat bread. It's supposed to be white bread, but I have been working to try to take a more "make it good for you/make it better for you" type of approach.

Oh...and if you make your own bread, all the power to ya! OK? I just used the good ol' store-bought stuffs.

Let me know if you use this. I hope you love it as much as I do! (a new comfort food for me, I think)

ENJOY!

Thursday, September 5, 2013

Tortellini with Edamame and Smoked Sausage

Lately I've really been lazy & really looking for some cheater/fake-out recipes. But ones that are pretty, not too far off the beaten path, and still semi-good for you. I know, I know...it may be asking too much!

But am I really? Whether you like/love her or not, Rachael Ray has given way to fake-out recipes & trying to make the point that you can cheat some of the recipes, but if you watch what YOU put in it...you have more control over the ingredients that go into it, therefore, having more of a handle on the nutritional value of what you make.

I'm not gonna lie, when I made my Lazy Lasagna (recipe HERE), I wasn't keeping in mind the nutritional value, just the convenience of it. Still really good!

As I continued to search Pinterest & the rest of the interwebs for more "quick, cheap & easy" (yet elegant) meals to try with the family,  I came across a pasta dish that seemed easy enough (recipe HERE). Plus, it had edamame in it! I've been drawn to the edamame thing lately, so I was intrigued.

If you are still unaware of what edamame is, it happens to be a beautiful, sexy & attractive name for soy beans. Loaded with protein! I've actually been eating some roasted & lightly salted edamame that tastes surprisingly like mild peanuts. Seriously!

But back to the pasta dish, here's what I did:

**********


TORTELLINI WITH EDAMAME & SMOKED SAUSAGE


Ingredients:

~ 1 bag frozen tortellini (I used tri-color)
~ 1/2 C shelled, frozen edamame
~ 1 link smoked sausage (I used turkey), sliced or diced
~ 1/2 bell pepper (I used red), thinly sliced or diced
~ 1/4 C onion, diced OR 3 Tbsp minced onion
~ 1/2 C Italian Butter (recipe HERE - see step 2) or Italian dressing


Directions:

* Make tortellini to package directions; mine called for being in boiling water for 3-5 minutes (I lightly salted the water & added a drizzle of extra virgin olive oil - optional); I did 5 minutes - keep reading for why

* While the pasta is cooking, lightly spray a skillet or wok with cooking spray & saute the smoked sausage, bell pepper & onion

* in the last 2-3 minutes of the pasta cooking, add the edamame to the pasta water to finish out the cooking

* once the pasta & edemame are done cooking, remove from heat & drain

* mix the pasta & edamame with the sausage, pepper & onion

* when all mixed together, drizzle in the Italian butter or dressing & toss (I made the Italian butter)

* Serve

**********

I want you to know that this is one of the fastest & easiest dishes I have ever done! And it was beautiful!


We served it up with Italian bread. I think the whole meal took about 15 minutes with the prep! And it was really, REALLY good!!

Now, as for the edamame term, don't tell my kiddos...they think they are eating something fancy. OK? Thanks!

Now then...

ENJOY!